How To Create a Custom Function In Excel
Mar4Written by:
2013/03/04 04:04 PM 
 Ever wondered how to create a custom function, otherwise known as a user defined function, in Microsoft Excel. Then read on to find out how easy it is to create a custom function or UDF (User Defined Function) in Excel.
Excel is probably by far the most well used business software around. This is probably because Excel is packed with features and functions. Most of these functions you will never use. However, you have probably found out by now that Excel does not have every single function known to man. Especially any functions that is unique to your situation.
By using the power of Visual Basic for Applications (VBA), you can code any custom or User Defined Function (UDF) only once and use it again and again in all worksheets and indeed all workbooks where needed.
Code Your Function
I bet you did not realize that you were going to become a part-time coder. Well you will at least have something to put on your CV.
In Microsoft Excel to create a user-defined function in, you first call up the Visual Basic Editor, which is located in the Tools | Macros menu (version 97 – 2003) or on the Developer Tab | Visual Basic Editor (version 2004 – onward). Once in the editor, navigate to Insert | Module menu item to open a blank module screen. This is where you'll type in your code. You can also use the ALT+F11 short-cut key combination.
Let’s say, for example, you want to remove leading and trailing spaces from some text in your worksheet. You try to use the TRIM() function supplied by Microsoft Excel. But to your horror you realize that this function will also remove all spaces within a given text string, including multiple spaces between words. This does not work for you because you want to keep the multiple spaces between words but only remove leading and trailing spaces. This could be the case in a Identity value of some sort. E.g. "ABC 234".
Because we are now coding in Visual Basic for Applications, there are additional functions or methods available to use that are perhaps not in Excel. These are Rtrim() and Ltrim(). Which are, as you might have guessed, Right Trim and Left Trim
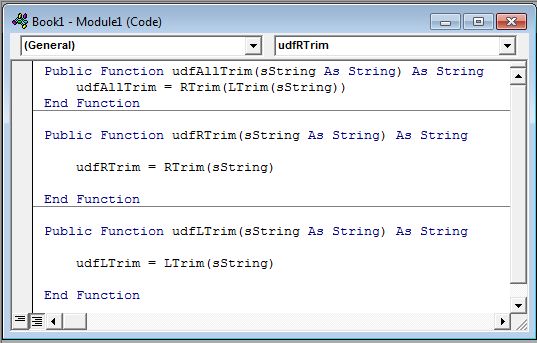
Below is the code that needs to go into your newly created module.
Public Function udfAllTrim(sString As String) As String
udfAllTrim = RTrim(LTrim(sString))
End Function
Now back in Excel select a cell and enter some text that contains leading spaces, trailing spaces and spaces in-between words. Example without the quotes, " ABC 123 ".
Now to use your newly created function, proceed as you would normally by selecting an adjacent cell, and insert the function. For later versions of Excel, the UDF will be picked up by intellisence.
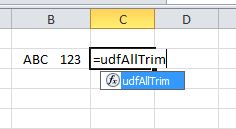
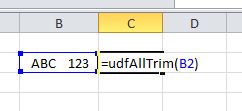
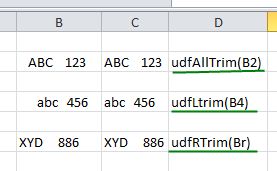
Hit enter to see the result. You should see your text with all leading and trailing spaces removed, but not the spaces between the two strings. As can be seen in the image below.
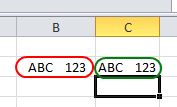
Why not add two extra functions to this. You can add the LTrim() function and the RTrim() function separately. That way you will have both these available to your excel worksheet. See below:
Now try all your functions out in Excel. See the results.
Where to from here?
Well the most obvious is for you to create a library of custom or User Defined Functions that you can use to make life easier for you in Excel. Also the next obvious thing is to put your UDFs into your Personal workbook so that they can be available to all workbooks you open. One caveat though is that functions created in the personal workbook do not travel with the workbook should you need to send that workbook to someone else. To overcome this, either put the functions into the workbook itself, as demonstrated above, or create an Excel add-in.
To see how to save or put your custom / User Defined Functions into an Add-in, see my post on How to put your custom functions into an add-in.
blog comments powered by