Creating a web forms user interface with C#
We’re back. Well hopefully you’ve enjoyed the two previous lessons and you’re looking for more. Your interest has been sparked and you’re keen to get going and move on to more complicated stuff. As each lesson goes, we will be building on the previous. Yes we have to crawl first before we can run.
What puts a lot of people off learning a new language is the learning curve and the time taken to become proficient again. Well small steps at a time. The whole idea is that you have got to keep moving. Taking small steps is at least moving you forward. Taking no steps leaves you stagnant and left behind.
In this lesson we will be looking at creating a user interface for the web, by
· �Demonstrating various ASP.Net server controls from the toolbox
· �Looking at absolute and relative positioning
· �Looking at some of the things in the layout toolbar.
Before carrying on I realise that it is rather time consuming trying to explain where different things are in the IDE, How to get there? what their purpose is? and so on. I thought that I could write a whole lesson on the IDE, but because of time, I thought that we could download a Video or a document that will get everyone familiar with the IDE. So that when I say property window or class window, everyone knows what I am talking about.
So here are some documents
And some Videos:
Well now we wait until you get familiar with the IDE ..........
Wow that was fast.
So let’s go ahead and create some code for interactive web forms.
Start off by creating a new web project. Call it whatever you want or leave the default. Drag three controls from the standard toolbar onto the design view surface. We want to drag a label, a text box (dbase: entryfield), and a button (dbase: pushbutton) onto the design surface. Notice that they align themselves at the top left corner and in series one after the other. Try and drag any control and try to position it somewhere else on the design surface. Notice that you can’t. The control keeps resetting to the same place. So how can we get the controls to position in a place where we want? Well you could use a series of enters to create new lines and tabs and spaces to change position horizontally. But this is very ugly and because of the way the web and browsers operate, you cannot be guaranteed that the control or web form will display as you intended.
So, for some time, developers have been using a simple technique to position web controls. That is making use of tables and putting the controls into cells of tables. So in your design view, add a table by select Table->Insert Table from the menu. You will be presented with a dialog box. This box helps you to set initial properties of your new table like the amount of rows and columns. Under 'size' change the rows and column values to 3 each, and click ok. A table is inserted into your designer
Drag your label to the top left cell of the table. Drag your textbox to the middle cell and drag your button to the right bottom cell. Run and test. You can therefore have tables within tables, set the row and column sizes, e.g. width and height. With a little imagination you can make your form look really attractive. Now we have more advanced layout control of our web form.
So now we have at least some form of positioning. But we are still hampered because we do not have exact pixel positioning. No fear all is not lost. There is another way. Delete the table and all the controls. Before you drop any more controls on the form. Right click on the tool bar and make sure that layout and style applications are selected. You will then find two new toolbars. Arrange them as you see fit. Now from the style application toolbar, make sure that “Manual” and “(new inline style)” is selected. Then go to tool->Options in the menu. Navigate to HTML Designer, expand that branch, and then select CSS Styling. On the right make sure Manual is selected. Then check the last selection which should be “Change position for absolute controls added using .......”
Drag a button control onto the design surface. It will first be dropped at the top left. Then select the button. Notice that you now have white handles all around the control. Select the Tab above the control and Drag. You can now drag the control to absolute position. How is this achieved? Switch to source view. You will notice that there is a property in the button tag. “Style” this then uses CSS to position the button. Try it with other controls.
One bug in VS as at this writing is that the label control does not obey this method. Because it does not have a type property. To overcome this. Drop a dive control. Toolbar->HTML->Div. Resize the div and then drag the div. This will in turn position the label.
This is the difference between relative and absolute positioning.
This brings on another way of layout. You can mix and match. You can have container control like the div with absolute positioning in that, and have the div set to relative position and put controls in the div, drop the div with the control to where you want it. To achieve this. Reset the global css options. Tools->Options->HTML Designer->CSS Styling. Uncheck the last selection. Then you can set the positioning of individual controls. Select the design view. Drop a button on the form. Try and reposition it. Notice you don’t have absolute position control. With the button still selected. On the menu, select format->position. Then select absolute under styling. Now you have absolute position control for that individual control.
There are a few problems with css positioning in my opinion.
You have to really know what you are doing; otherwise you could spend hours trying to get the right look.
Because you do not know the users browser setting, especially text size and screen resolution, you could end up with a problem e.g. the user has their resolution set to 800x600. You set a control to be in absolute position at 920:715. That user will not see it. Their browser will need to be scrolled. Not elegant in my opinion. So I tend to use tables. Yes its old school, but it works.
Using server controls.
Now that we have that out of the way lets dive into using some server controls. They are called server controls because they differ from normal HTML control in that the server ie IIS and the runtime engine take control of the style and behaviour of the control. They are not static, and the server then replaces the functionality with HTML control at render time.
In source view, make sure your Default.aspx page looks similar to this:
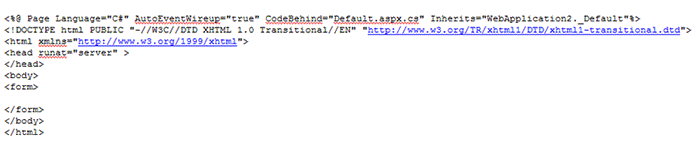
It does not have any controls and only has but the basic HTML tags. Make sure that you have set everything to relative positioning. Tools -> Options -> HTML Designer ->CSS Styling, make sure the last selection is unchecked.
Switch to design view. Drop a table onto the form. Table -> Insert table. Set 10 rows and 3 columns. Click ok. Highlight the first row right click select modify->merge cells from the popup menu. The cells are now merged into one. You can reverse this by selecting the cell and right click Modify->Split cells and set the number of cells you want.
We are now going to put a number of controls onto the form inside the table.
Drop a label into the top row. Drop another label into the first cell of the third and fourth row.
Drop a textbox into the second cell of the third row.
Drop a dropdown list into the second cell of the fourth row
Drop two radio buttons (not Radiobuttonlist, we will cover this at another time) into the second cell of the fifth row.
Drop a check box into the second cell of the sixth row.
Set the text property of the Label in the top row to something that might resemble a title. I set it to “My new web based interactive form”. Set its forecolor to “Yellow”, and expand the font property and set Bold to “true” and Name to “Tahoma”.
Select the top cell and set its BgColor to “Maroon”. Set the style property of the cell to “text-align: center”.
Set the text of the second label to “Name”
Set the text of the third label to “Favourite Color”
Select the dropdownlist. In the properties window, find the Items collection property, and click the button. A form pops up where you can add members to the collection and set the properties. Click the add button. On the Right Type in “Select Color ...” and enter. The text and value are the same. Do the same for the other items in the collection. Add as many colors as you like.
Select the radio buttons. Change their text to “Choice 1” and “Choice 2”. Also, in order for the Radiobuttons to work as a group, you have to supply a group name and all radio buttons that need to act as a group must have the same group name. So find the GroupName in the property window of each radiobutton and set it to a name of your choice. I set it to “Choices”
Select the button control and set its text property to “Submit”.
For the last two rows select each row individually and merge the cells. Just like we did with the first row.
From the toolbox under the standard tab locate the literal control and drop one literal control in each row at the bottom. Leaving you with two literal controls, one on each row.
The literal control is a special control. It is like a label except that it can take literal html as its text, and will render that correctly
You might want to set the size of the table and columns to suite yourself. I am not going into that right now. But I am sure that you have set table properties before. It’s just like any other control.
Run and test the web page. At this moment in time it’s just a basic static web page. There is no interaction. Nothing happens when you click the button. So let’s change that. We can raise and event create an event handler and write code to some something based on that event.
Ok, close the browser. In the design view double click on the button. What happened? The code behind file opened with an event handler method already defined. Just like in dbase. Here we write the code that executes when a user clicks the button. Just like in any window form. Each control has a default event handler. For the button it is the onclick event. The nature of the button. So double clicking the button in the designer automatically created the event handler for us.
What we are going to do is write code that takes the text entered into the text box, and set the literal1’s text to that, but insert some html tags in the literal to style the text.
So write the following in the buttons onclick event handler.
Literal1.Text = "< b>Well done “+ TextBox1.Text +”< b/>";
Remember the line termination character.
What is this doing? Simple, we are making the text of the literal1 control equal to the textbox text. Plus we are inserting some HTML formatting code
Run the app and test. See if it works.
Cool hey. It worked. Very easy.
This is what is known as a postback, the server is taking the data submitted by the user and posting something back to the browser. What it posts back is dependent on the code that you write.
So lets make it more interesting. Close the browser. In design view. Look at the textbox that we are using to collect names. What happens if someone does not fill it in? Well then our data is corrupted. How do we prevent that? We do that by validation. So from the toolbox find the validation tab, expand it and drop a requiredfieldvalidator into the cell next to the textbox, or you can drop it next to the text box. It’s up to you. Select the validate, and set some properties in the property window.
· �Errormessage = “A name is Required”
· �ControlToValidate = “TextBox1” (use the dropdown).
Run and test. Now without filling anything in, click the button. Notice the error message we just created. Also notice that nothing was posted from the browser to the server, this validation happened client side. So it must have been some kind of client side script either JavaScript or vbscript. But how did that get there, we never wrote any JS, did we?
So in your browser view source. You will notice a whole bunch of extra code that you did not write. Thanks to VS. As you scroll down through the code you will find a script that handles the validation. It looks like this:
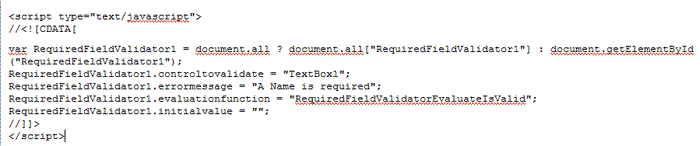
Ain’t that cool. Talk about RAD. Yes VS does a lot for you so that you can concentrate on the task at hand. Writing the logic for your app.
One more thing I want to show you. Close your browser. In design view. Add a CompareValidator to the cell next to the dropdownlist. Set its properties:
· �Error message to “Please select a valid color.”
· �Text o “*” (star) set the text of the requiredfield validator to “*” aswell.
· �ValueTocompare to “Select a color ...”
· �Operator to “NotEqual”
· �ControlToValidate to “DropDownList1”
Now from the toolbox validation tab, select a validationsummary control and drop it below the table. No need to set any properties. Just run and test. Click the button without filling anything in or selecting anything.
What happened? The form validation kicked in. The summary was displayed with a star next to the offending controls. The summary gives your users a central focus point of all the error messages. Now ain't that cool.
Fill in the required fields and re-submit. The errors go away and the form is validated and submitted. Yes we have data integrity.
Play around with some of the other properties, add some more controls. Write some more code. Have fun and enjoy.